> ## Documentation Index
> Fetch the complete documentation index at: https://docs.healops.ai/llms.txt
> Use this file to discover all available pages before exploring further.
# Datadog
### Step 1: Create API Key
In Datadog, create an API Key.
To create an API key, go to your organizational settings in Datadog and click **API Keys**. Or visit [https://app.datadoghq.com/organization-settings/api-keys](https://app.datadoghq.com/organization-settings/api-keys)
1. Click **+ New Key** at the top right of the screen
2. Name your new key **tracer**
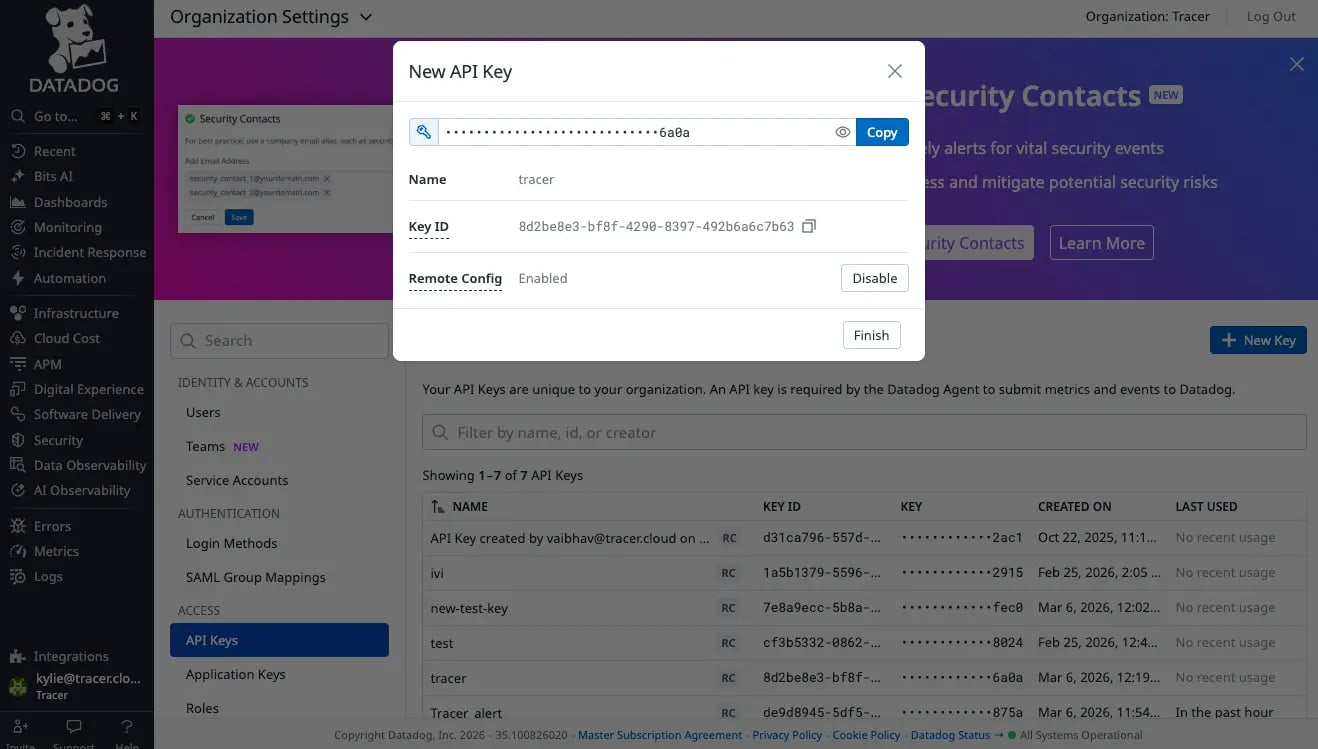 3. Copy your new API key and hit **Finish**
### Step 2: Create Application Key
In Datadog, create an Application Key.
To create an Application Key, go to your personal settings in Datadog and click **Application Keys**. Or visit [https://app.datadoghq.com/personal-settings/application-keys](https://app.datadoghq.com/personal-settings/application-keys)
1. Click **+ New Key** at the top right of the screen
2. Name your new key **tracer**
3. Copy your new API key and hit **Finish**
### Step 2: Create Application Key
In Datadog, create an Application Key.
To create an Application Key, go to your personal settings in Datadog and click **Application Keys**. Or visit [https://app.datadoghq.com/personal-settings/application-keys](https://app.datadoghq.com/personal-settings/application-keys)
1. Click **+ New Key** at the top right of the screen
2. Name your new key **tracer**
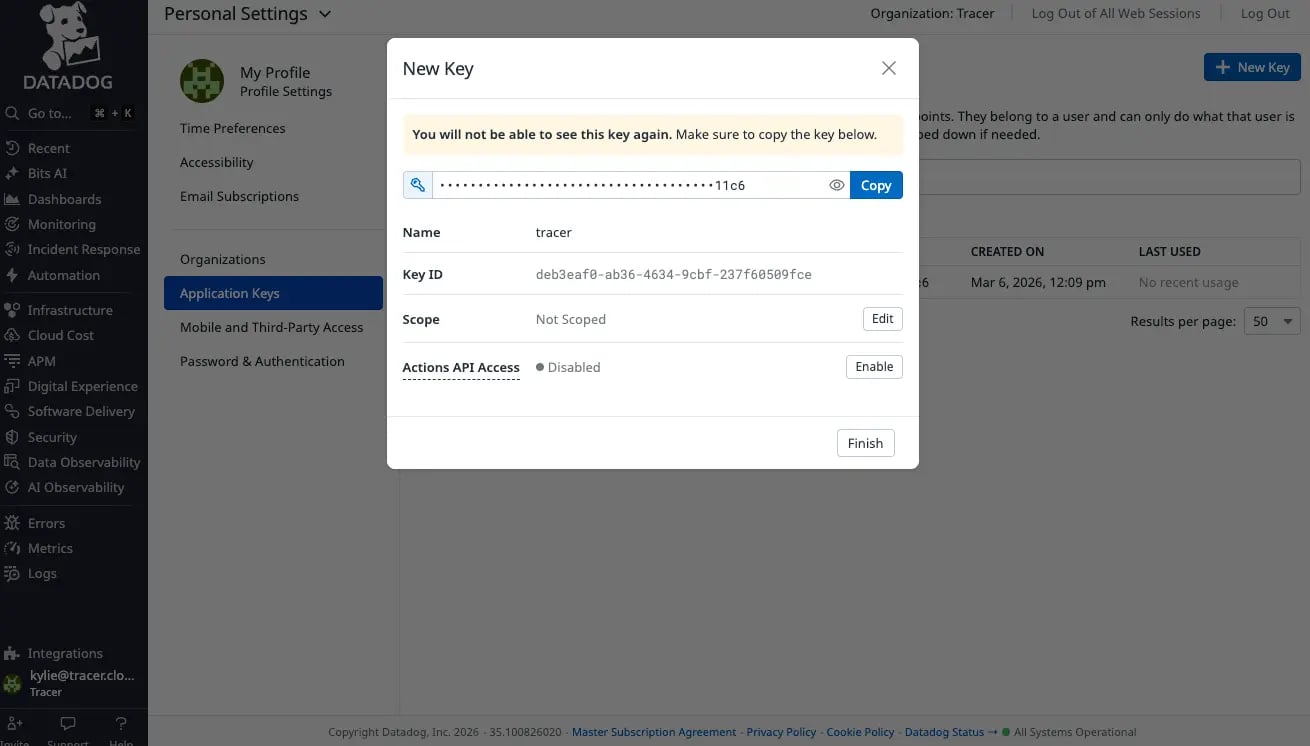 3. Click **Edit Scope** and ensure the following minimum requirements:
* events\_read
* logs\_read\_data
* logs\_read\_index\_data
* monitors\_read
3. Click **Edit Scope** and ensure the following minimum requirements:
* events\_read
* logs\_read\_data
* logs\_read\_index\_data
* monitors\_read
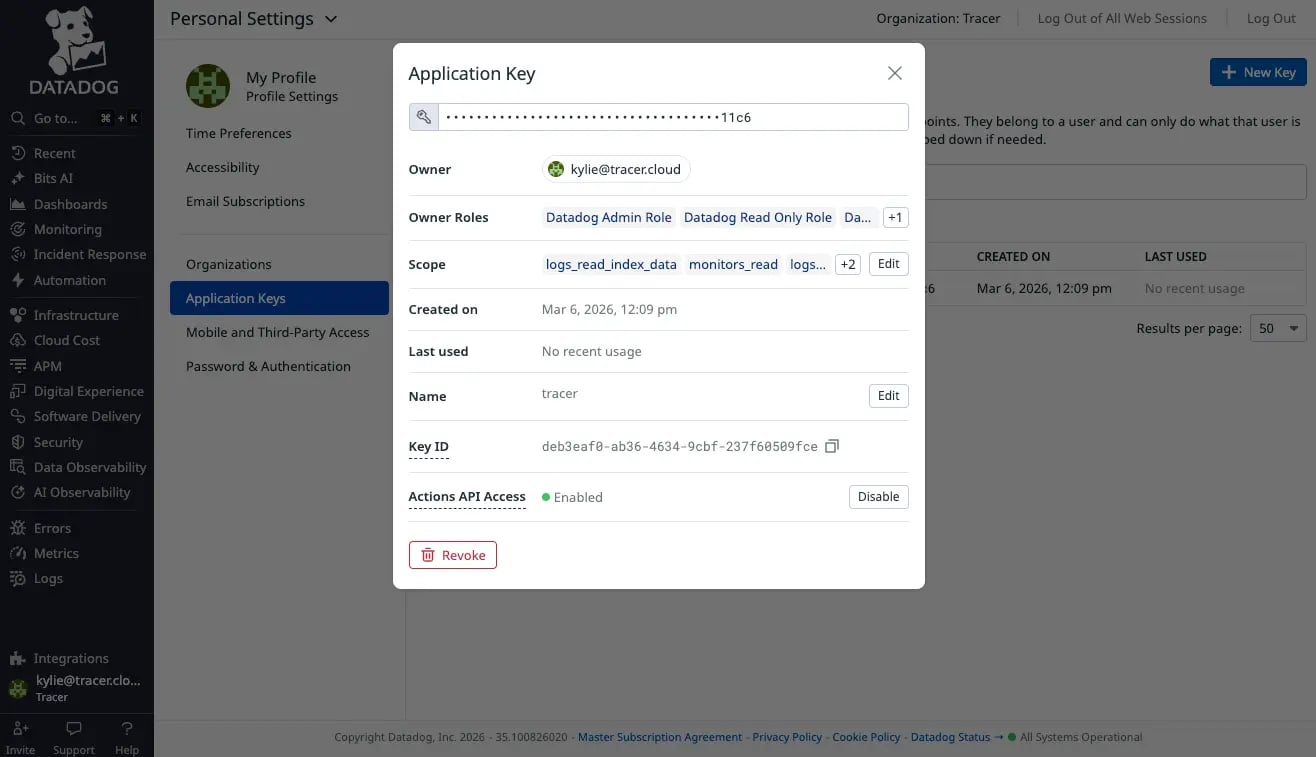
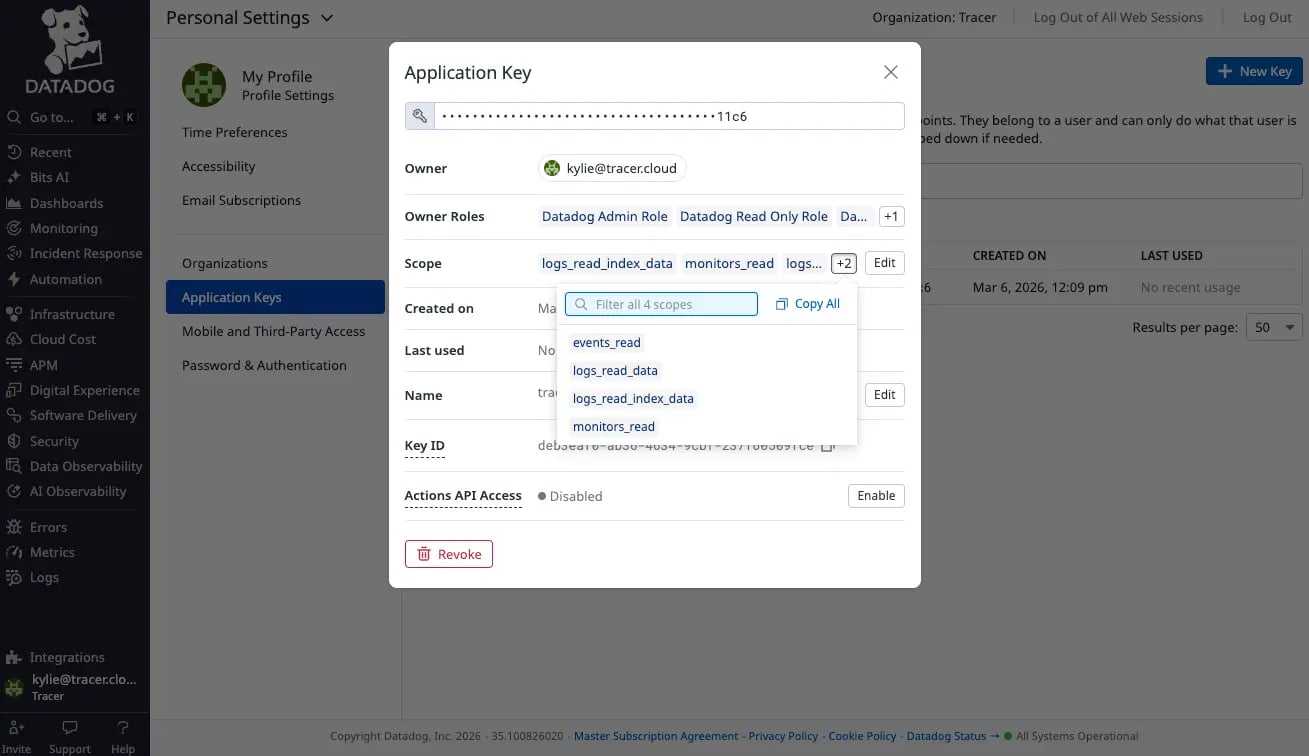 4. Under **Actions API Access** — click **Enable**
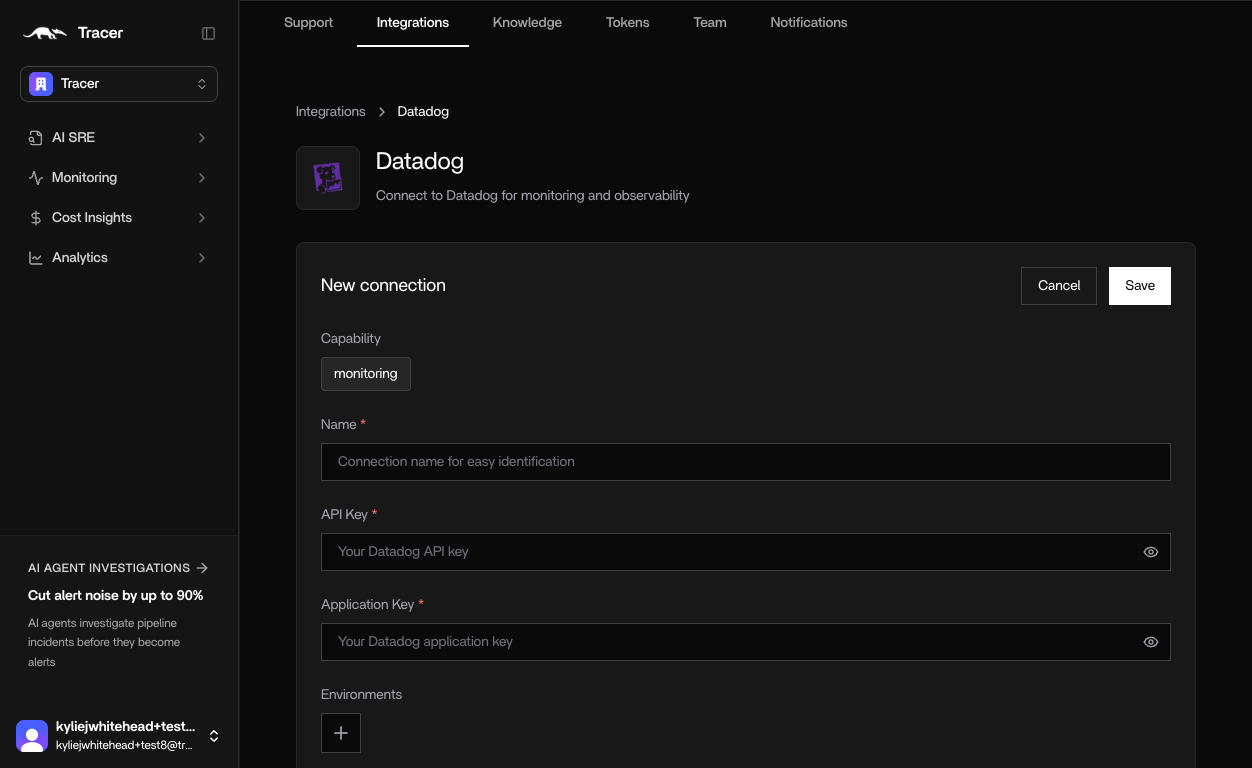
 ### Step 3: Connect Datadog to HealOps
1. In HealOps, go to **Integrations** → **Datadog**
2. Enter a name
3. Paste your [API Key](https://app.datadoghq.com/account/login?next=%2Forganization-settings%2Fapi-keys) and [Application Key](https://app.datadoghq.com/account/login?next=%2Forganization-settings%2Fapplication-keys) from Datadog
4. Click **Save**.
### Step 3: Connect Datadog to HealOps
1. In HealOps, go to **Integrations** → **Datadog**
2. Enter a name
3. Paste your [API Key](https://app.datadoghq.com/account/login?next=%2Forganization-settings%2Fapi-keys) and [Application Key](https://app.datadoghq.com/account/login?next=%2Forganization-settings%2Fapplication-keys) from Datadog
4. Click **Save**.
 ***
## SaaS Webhook Setup (push-based alert ingest)
The pull-based integration above polls Datadog for monitor events. For lower
latency you can configure Datadog to **push** monitor alerts directly to
HealOps via a webhook. HealOps validates each request with HMAC-SHA256 and
routes it to the async investigation queue.
### Step 1: Generate a per-tenant webhook secret
Choose a strong random string (at least 32 bytes) to use as the shared secret.
Store it in HealOps for your tenant using the credentials API:
```bash theme={null}
curl -X POST https://api.healops.ai/api/v1/tenants/{YOUR_TENANT_ID}/credentials \
-H "Authorization: Bearer $ADMIN_JWT" \
-H "Content-Type: application/json" \
-d '{
"integration": "datadog",
"credentials": {
"DD_WEBHOOK_SECRET": "your-random-secret-here"
}
}'
```
`YOUR_TENANT_ID` is your Clerk organization ID (visible in the HealOps dashboard
under **Settings → Organization**).
### Step 2: Register the webhook in Datadog
1. In Datadog, go to **Integrations** → **Webhooks** (or search "Webhooks").
2. Click **New** to add a webhook.
3. Set the **URL** to:
```
https://api.healops.ai/webhooks/datadog/{YOUR_TENANT_ID}
```
4. Leave the **Payload** as the Datadog default (all fields are normalized
automatically by HealOps).
5. Under **Custom Headers**, add:
| Header name | Value |
| --------------------- | ------------------------- |
| `X-Datadog-Signature` | `{{WEBHOOK_HMAC_SHA256}}` |
The `{{WEBHOOK_HMAC_SHA256}}` template variable is resolved by Datadog to
the HMAC-SHA256 hex digest of the request body, signed with the secret you
configure in the next step.
6. Click **Save**.
### Step 3: Set the signing secret in Datadog
In the same webhook configuration, paste your secret (from Step 1) into the
**Secret** field. Datadog will use it to compute `{{WEBHOOK_HMAC_SHA256}}`.
### Step 4: Wire the webhook to a monitor
1. Open the Datadog monitor you want to forward.
2. In the **Notify your team** section, type `@webhook-`.
3. Save the monitor.
HealOps will now receive an event every time the monitor transitions state,
validate the HMAC signature, and enqueue the alert for an async RCA
investigation.
### Behaviour at a glance
| Scenario | HTTP response |
| ---------------------------------------------------- | ----------------------------------------------------------------- |
| Alert accepted (new) | `202 Accepted` — `job_id` returned |
| Duplicate alert (same fingerprint already in flight) | `202 Accepted` — `deduplicated: true`, existing `job_id` returned |
| Queue full | `429 Too Many Requests` — `Retry-After: 30` |
| Bad or missing HMAC signature | `400 Bad Request` |
| Unknown tenant | `404 Not Found` |
***
## SaaS Webhook Setup (push-based alert ingest)
The pull-based integration above polls Datadog for monitor events. For lower
latency you can configure Datadog to **push** monitor alerts directly to
HealOps via a webhook. HealOps validates each request with HMAC-SHA256 and
routes it to the async investigation queue.
### Step 1: Generate a per-tenant webhook secret
Choose a strong random string (at least 32 bytes) to use as the shared secret.
Store it in HealOps for your tenant using the credentials API:
```bash theme={null}
curl -X POST https://api.healops.ai/api/v1/tenants/{YOUR_TENANT_ID}/credentials \
-H "Authorization: Bearer $ADMIN_JWT" \
-H "Content-Type: application/json" \
-d '{
"integration": "datadog",
"credentials": {
"DD_WEBHOOK_SECRET": "your-random-secret-here"
}
}'
```
`YOUR_TENANT_ID` is your Clerk organization ID (visible in the HealOps dashboard
under **Settings → Organization**).
### Step 2: Register the webhook in Datadog
1. In Datadog, go to **Integrations** → **Webhooks** (or search "Webhooks").
2. Click **New** to add a webhook.
3. Set the **URL** to:
```
https://api.healops.ai/webhooks/datadog/{YOUR_TENANT_ID}
```
4. Leave the **Payload** as the Datadog default (all fields are normalized
automatically by HealOps).
5. Under **Custom Headers**, add:
| Header name | Value |
| --------------------- | ------------------------- |
| `X-Datadog-Signature` | `{{WEBHOOK_HMAC_SHA256}}` |
The `{{WEBHOOK_HMAC_SHA256}}` template variable is resolved by Datadog to
the HMAC-SHA256 hex digest of the request body, signed with the secret you
configure in the next step.
6. Click **Save**.
### Step 3: Set the signing secret in Datadog
In the same webhook configuration, paste your secret (from Step 1) into the
**Secret** field. Datadog will use it to compute `{{WEBHOOK_HMAC_SHA256}}`.
### Step 4: Wire the webhook to a monitor
1. Open the Datadog monitor you want to forward.
2. In the **Notify your team** section, type `@webhook-`.
3. Save the monitor.
HealOps will now receive an event every time the monitor transitions state,
validate the HMAC signature, and enqueue the alert for an async RCA
investigation.
### Behaviour at a glance
| Scenario | HTTP response |
| ---------------------------------------------------- | ----------------------------------------------------------------- |
| Alert accepted (new) | `202 Accepted` — `job_id` returned |
| Duplicate alert (same fingerprint already in flight) | `202 Accepted` — `deduplicated: true`, existing `job_id` returned |
| Queue full | `429 Too Many Requests` — `Retry-After: 30` |
| Bad or missing HMAC signature | `400 Bad Request` |
| Unknown tenant | `404 Not Found` |